
Is Your Car Radiator Groaning? Identifying and Fixing a Defective Water Pump, Including the Use of Bearing Puller Tools
If you’ve been following our series on cooling system issues with the classic Chevrolet Caprice, you might think we’re constantly battling leaks. While it’s true that cooling system maintenance is crucial, this water pump replacement was actually performed before we discovered a crack in the engine block. In our previous articles, we touched upon the noisy and leaking water pump that needed replacement, hinting at some complications along the way. Now, let’s rewind and delve into the water pump replacement adventure, highlighting key diagnostic steps and the tools you might need, including specialized tools like a Long Bearing Puller Tool Used On Radiators For Cars in certain scenarios.
Recognizing the Warning Signs: Is That a Groaning Sound?
Alt text: Automotive stethoscope being used to pinpoint noise from a car water pump bearing, a diagnostic step for radiator and cooling system maintenance.
Alt text: Mechanic using a long screwdriver as a makeshift stethoscope to listen to engine components, a technique for diagnosing car radiator and water pump issues.
For those who are intimately familiar with their vehicles, unusual sounds from under the hood are often immediately noticeable. When it’s a sound you’ve heard before, you likely have a good idea of the potential culprit. In this case, the sound was a distinct “groaning.” It became apparent when the air conditioning was in use. With the engine off, the first suspect was the water pump. We had observed some unexplained coolant loss without any visible leaks on the ground. (Just to clarify, when we mention antifreeze and coolant, we’re essentially talking about ethylene glycol – the terms are interchangeable in this context.)
The coolant leak was minimal, sometimes accompanied by the smell of antifreeze, and sometimes not. Pressure testing the cooling system would typically be the first step. However, as we discussed in a previous article about repairing damaged threads, our pressure tester was incompatible with the replacement plastic radiator’s neck, which was slightly smaller than the original brass design. Instead of investing in an adapter or modifying the tool, we opted for a wait-and-see approach. It’s worth remembering that a leaking water pump isn’t always noisy, and a noisy pump doesn’t always leak.
Beginning the Diagnostic Hunt for the Faulty Radiator Component
A good starting point is to grab the fan blade (as shown in Photo 1 in the original article, though not included here for brevity, the action is to check for fan wobble) and try to wobble it. In our case, there was noticeable movement originating from the pump pulley, indicating looseness in the pump bearing. It’s important to pinpoint the source of the movement, as it could also be a sign of a worn fan clutch.
To confirm that the noise is indeed coming from the pump bearing, a stethoscope is invaluable. With the engine running, carefully place the end of the stethoscope hose on the pump’s nose, just behind the pulley, as illustrated in Photo 2. This positions you as close as possible to the bearing, making it easier to detect any resonating sounds. Listening with the air conditioning both on and off can help verify if the noise is related to the water pump. An assistant can be helpful for this step. Exercise extreme caution to avoid getting entangled in moving belts or the fan blade.
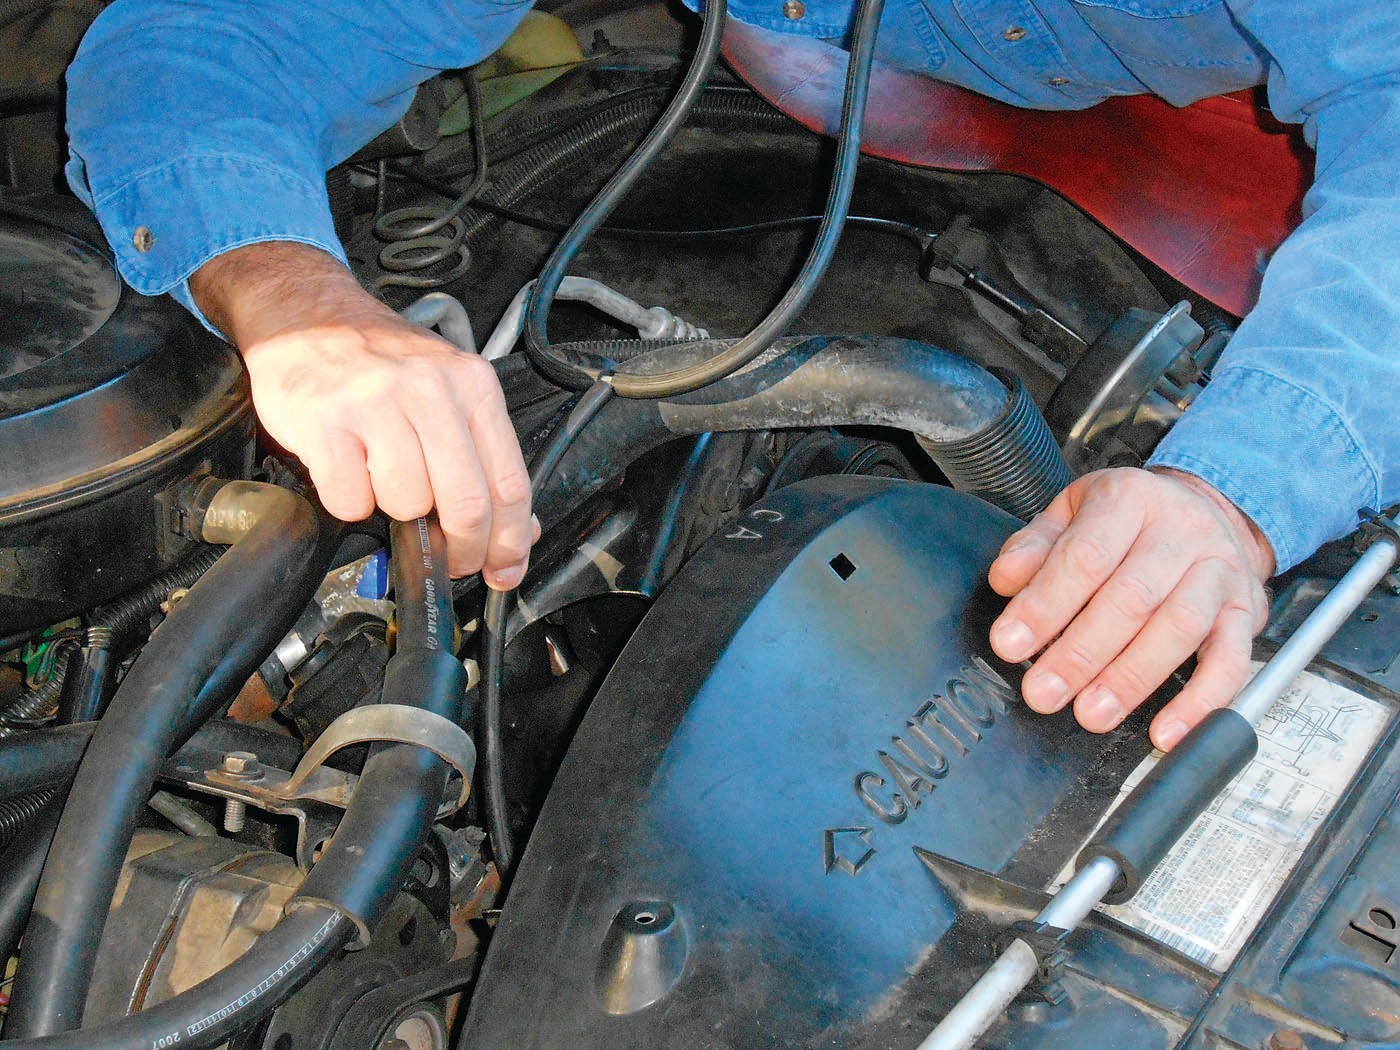
Don’t have a stethoscope? Photo 3 demonstrates a practical alternative. A long screwdriver can serve as an effective listening device. These extra-long screwdrivers are often used for reaching lower radiator hose clamps and can be repurposed for diagnostics. Place the metal tip of the screwdriver on the pump’s nose as before, and put your ear against the plastic handle. The screwdriver will transmit the sound, perhaps not as clearly as a stethoscope, but sufficiently. Remember to be cautious of the running engine and spinning fan. While you’re listening, you can also check the alternator and other components for any unusual noises.
Preparing for the Water Pump Replacement Project
Over the years, we’ve replaced this “lifetime-guaranteed” water pump multiple times, and the sound of bearing failure is unfortunately familiar. Even if there were other potential noise sources under the hood, the fan wobble test alone strongly suggested it was time for a water pump replacement.
Our 1986 Chevrolet Caprice Classic with a 305 Chevrolet engine is our daily driver. While replacing a water pump on a small block Chevy engine isn’t inherently difficult, the process of accessing the pump (as shown in Photo 4 in the original article, engine bay view) might seem daunting to some. However, breaking it down into smaller, manageable steps makes the task less intimidating.
Most pump manufacturers recommend flushing the cooling system before installing a new pump. This is good practice, as it helps remove any debris, including potential remnants from the failing bearing.
(Tool and Torque Note: Many photos might show box wrenches for clarity in photography. In reality, ratchets, sockets, and air-powered tools are often preferred for efficiency. Use the tools you are comfortable with and have available.)
Torque specifications for these fasteners aren’t critically precise. The general rule is to avoid over-tightening. Torque wrenches are not commonly used for water pump installations. If you prefer to know, fastener size can guide torque range if service manual specs are unavailable. For example, 3/8″-16: 22-32 ft. lbs.; 5/16″-18: 14-20 ft. lbs.; ¼”-20: 6-9 ft. lbs. These are general guidelines, and erring on the lower side is safer.
We’ll mention both metric and fractional fastener sizes as guides. A fastener described with a fractional size might be considered metric by Chevrolet, but either wrench type will generally work.
Supply Checklist: Compile a list of necessary items. This includes the new water pump, cooling system flush, antifreeze, and a thermostat & housing gasket. Critically inspect belts and hoses. With belts removed for access, inspection is easy. Turn belts inside out and flex them, looking for cracks, missing rubber chunks, or oil saturation. Many hoses will be disconnected, allowing for thorough inspection. Check for external oil saturation (common on lower radiator hoses), abrasions, and examine hose ends where they connect to the radiator or engine. Small cracks or rubber separating from reinforcement cords indicate replacement is needed. Squeeze hoses – they should feel firm, not mushy or rock hard. Inspect hose interiors for cracks. While added expense, replacing questionable belts and hoses now minimizes future issues and labor. If replacing, keep old parts until the job is complete. Usable old belts can be kept as emergency spares in the trunk.
Alt text: Underside view of a car radiator hose showing antifreeze leak originating from the water pump above, confirming radiator component failure.
Performing a System Flush for Optimal Radiator and Cooling System Health
We used a Prestone liquid flush, widely available at auto parts stores. For systems with significant rust, consult your local auto parts store for specialized flush recommendations.
Basic flush instructions are on the container, but our method has slight variations. Start with a completely cool engine. Remove the radiator cap and drain the radiator. Some radiators have a drain valve like the one shown in Photo 5 in the original article (radiator drain valve in operation). If no valve exists or it’s stuck, carefully detach the lower hose from the radiator and collect coolant in a pan.
Loosening the lower radiator hose clamp is the first step. Access can be from underneath or over the fender, depending on clamp position and surrounding obstructions. Note the screw head’s direction for easier reinstallation in the same orientation.
The long screwdriver, previously used for listening, is ideal for reaching the lower clamp, as shown in Photo 6 in the original article (screwdriver reaching lower radiator hose clamp). Loosen the clamp until it’s free from the screwdriver tip, then slide it back over the hose. Hoses often bond to the radiator neck. Careless removal can damage the radiator. A hose removal tool is best, often easier to use from underneath. Space limitations under the car required us to elevate the front end and use jack stands under the frame rails behind the front wheels.
Underneath, we immediately noticed the pump leak. Photo 7 shows antifreeze tracking down from the pump onto the lower radiator hose, ending in a droplet. Rust on the pump’s bottom further confirms a long-term leak. This reinforces that a water pump can be both noisy and leaky. Replacing it should resolve our cooling system leak issues.
Returning to the flush procedure, a Craftsman cotter pin removal tool works effectively as a hose removal aid, as seen in Photos 8a & 8b in the original article (cotter pin tool being used for hose removal). Slide the bent pick portion between the hose and neck, gently working around the radiator neck’s perimeter to break the bond. Once the hose turns freely, twist slightly back and forth while pulling straight away from the radiator to remove it. Be prepared for coolant spillage and proceed slowly. After draining, reattach the hose and snug the clamp, or close the drain valve. If your engine block has accessible drain plugs, remove them to drain more old coolant. Drain plugs are typically low on the block sides in V-8 engines. If no coolant drains, rust buildup inside the block might be blocking the drain hole. Use a small screwdriver to clear it. After draining, replace plugs with Teflon tape or sealant on the threads.
Remember, antifreeze/coolant (ethylene glycol) is poisonous and attractive to animals. Do not leave it in open containers. Transfer it to sealed containers like old milk jugs and take it to a recycling center for proper disposal.
Alt text: Close-up of a Craftsman cotter pin removal tool being used to detach a car radiator hose from the radiator neck, aiding in cooling system maintenance.
Alt text: Mechanic using a cotter pin removal tool to carefully separate a radiator hose, a step in radiator and water pump replacement procedure.
Optional Back Flushing of the Heater Core for Enhanced Radiator Efficiency
For a more thorough flush, back flush the heater core. Disconnect the heater hoses. Disconnect the heater hose from the engine and the other from the water pump. If a heater control valve is present (like in Photo 9 of the original article, heater control valve), loosen the hose clamp and disconnect the valve from the hose on the heater core side. A short 3″ hose section remains connected to the heater core. Leave the hose between the control valve and intake manifold undisturbed unless replacement is needed. The 5/8″ ID hose on the control valve side is the heater core inlet. A larger ¾” ID hose is the outlet or “return hose,” connecting to the top of the water pump (visible in Photo 10 of the original article, ¾” return hose connection). On some vehicles, the return hose might connect near the pump housing instead of directly to the pump. The return hose is always the heater hose closest to the pump.
Place an old milk jug over the 3″ hose end to catch discharged coolant. Secure the jug. Fit a straight brass hose nozzle (vintage style) into the ¾” heater hose removed from the pump. Turn the nozzle fully on and wrap a rag around the connection to minimize squirting. Have someone turn on the water while you hold the nozzle. Flush fresh water through the heater core until the discharge runs clear. This back flushes the heater core, dislodging rust buildup and potentially improving heater performance. Repeat this a couple of times for even more thorough cleaning. Reconnect the heater hoses when the water runs clear.
Removing the Thermostat for a More Effective Radiator Flush
Removing the thermostat enhances chemical flush circulation. Accessing the thermostat housing requires moving wires and vacuum hoses. Even if confident in reconnection, tag each hose and wire or draw a connection map. Disconnecting and labeling is quicker and easier than working around obstructions. Inspect vacuum hoses – they are often neglected until failure. Replace stiff, oily, or mushy hoses. Common vacuum hose size is 5/32″, but bring samples to the parts store if unsure. Clearly label all removed hoses.
Once clear, loosen the upper radiator hose clamp and remove the hose. The thermostat housing neck is more robust than radiator necks, reducing damage risk. A hose removal tool can still ease removal. Photo 11 of the original article (thermostat housing removal) shows a 9/16″ socket with extension being used to remove the two bolts and lift off the thermostat housing. Lift out the thermostat (Photo 12 in the original article, thermostat removal). Some thermostats are simply placed in a recess, while others twist and lock. Consult the service manual if unsure about thermostat mounting.
Alt text: Heater control valve in a classic 1986 Chevrolet Caprice, part of the car radiator and cooling system components.
Alt text: ¾ inch heater return hose connected to the top of the water pump in a car engine, a detail in radiator and cooling system layout.
Alt text: 9/16 socket and extension tool being used to remove the thermostat housing bolts during car radiator maintenance.
Alt text: Car thermostat sitting in its recess in the intake manifold after removal, a step in radiator and cooling system servicing.
Reassemble without the thermostat, using a new gasket (reuse the old one if intact). Reconnect hoses and wiring, referring to your routing notes.
With hoses reconnected, clamps tightened, drain valve closed, and block drain plugs replaced, add the chemical flush. Follow the flush bottle’s instructions.
Fill the radiator with flush, start the engine, and turn the heater to maximum. Water movement in the radiator will be immediate due to thermostat removal. If the level drops, refill to the “cool” level and replace the radiator cap tightly. Thermostat removal prevents normal engine heating. To compensate, partially block the radiator with cardboard or a blanket to increase engine temperature and flush effectiveness. Monitor the upper radiator hose temperature by hand to gauge the effect of the restriction.
After the recommended flush time, shut off the engine and let it cool completely. Once cool, repeat the draining process. Never remove the radiator cap when hot – the system is pressurized and can cause burns. Collect drained fluid and take it to a recycling center with the old coolant. Plastic milk jugs or old antifreeze jugs are suitable for disposal.
Next, we will proceed with removing the old water pump. In situations beyond typical water pump replacement, such as radiator core repair itself, specialized tools like a long bearing puller tool used on radiators for cars might become necessary. While not directly used in standard water pump replacement, understanding the range of tools available for comprehensive radiator and cooling system work is important for any automotive enthusiast or professional. These specialized tools are designed for specific tasks, such as removing bearings from radiator components or accessing hard-to-reach areas within the cooling system, highlighting the depth and complexity of automotive repair and maintenance.