So, I’ve received a lot of interest in the roof rack I built for my truck cap recently, along with requests for parts lists and instructions on how I made it. Well, here it is.
This project started because I disliked how high the THULE bars sat on my cap. I really admire the design of Prinsu and Frontrunner racks and their track systems for modularity. I spent months researching materials to build my own rack because I knew I wanted to construct it myself. Primarily, this was due to the high cost of Prinsu, Frontrunner, and similar systems from Warrior, Baja, etc. This DIY approach was my economical attempt to create something comparable. I explored local hardware stores, Lowes, and Home Depot, sourcing parts from all three.
Parts List:
- 4 – 10ft lengths of Unistrut Channel 1-5/8″ X 3/4″ Galvanized – $16.75 each = $67.00
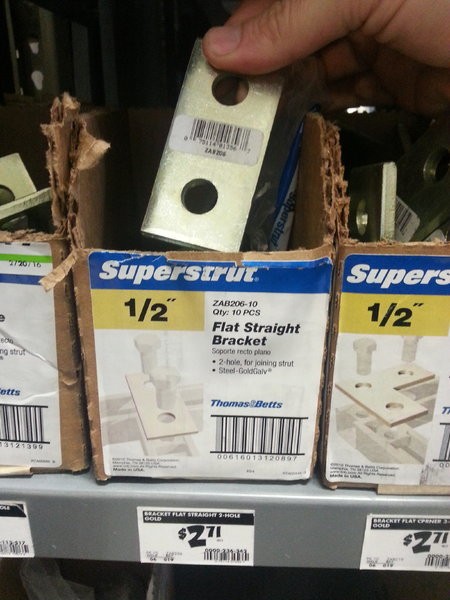
- 4 – 1/2in (hole size) flat straight galvanized brackets – $2.71 each = $10.84
- 4 – 1/2in flat corner galvanized brackets – $2.71 each = $10.84
- 4 – Bags of 1/4in Universal Cone Nuts – $3.00 each = $12.00
- 1 – 2ft length 1-5/8 X 1-5/8 INCH square Unistrut (available at local HD) $6.00 each = $6.00
- 26 – 1/4″ – 20 x 1.5″ truss head stainless steel bolts (5 packages of 6) – $5.64 = $28.20
- 26 – 1/4″ x 3/4′ zinc-coated steel washers – $1.88 total = $1.88
- 26 – 1/4″ Nylon Lock Nuts (stainless steel) (7 Packages of 4) – $1.95 = $13.65
- 2 – Aluminum 2.5in x 6ft long x 1/8in sheets (optional side panels for decoration) – $12.00 each = $24.00
Total Cost – $174.41 or $150.41 without side panels
Paints (already owned):
- 2 cans of Primer
- 2 cans of Rustoleum Bedliner
- 2 cans of Gloss black
Reference images of parts are shown below.
The holes in the Unistrut components are 1/2in, which was the only size available in my area. I used 1/4in hardware with heavy-gauge washers. While other brackets might work, these are robust and designed for Unistrut systems.
All component hardware is 1/4in Steel GoldGalv, a galvanized and zinc-dipped material. I opted for stainless steel and zinc-coated hardware for New England weather resistance.
Assembly Process:
My first step was cutting the (4) 10ft lengths of 1-5/8″ X 3/4″ Unistrut Channel:
- 2 cut to 52 inches – These became the side rails of the roof rack.
- 4 cut to 47 inches – These became the cross members of the roof rack.
I laid them out on a table to visualize the rack and double-check measurements.
Next, I cut the risers (feet) from the 1-5/8″ X 1-5/8″ square Unistrut channel. From the 24in piece, I cut (4) 8in wide segments.
Using the 1/2in flat corner brackets, I bolted together all four corners of the rack frame. I used a carpenter’s square to ensure perfect 90-degree angles at each corner.
- Some cuts weren’t perfectly straight, so the square helped maintain the correct shape.
- Those with better tool access could miter the corners or weld them, potentially saving $30-40 on materials.
- The bolt system is very modular, allowing for adjustments and placement anywhere along the Unistrut channel.
Next, I added the cross members using 1/2in flat straight brackets to keep them flush with the side rails.
Once fully bolted, I painted all parts using my standard painting process: 2 coats of primer, 2 coats of Rustoleum Bedliner, and 2 coats of gloss black.
Finally, mounting the rack. Online, you can find T-nuts, but getting the right measurements for your tracks can be tricky. I found an aluminum piece that fit perfectly with a square nut, functioning like a T-nut.
- Option #2 would be bolting the “feet” directly to the roof, which is also a viable option if you don’t have tracks.
- Option #3: Use Unistrut as the track itself, which would work great and is what I’d likely do if tracks weren’t already installed.