
Dyno tuning relies heavily on accurate data acquisition, and OBD2 (On-Board Diagnostics) plays a crucial role in this process. This guide provides a detailed walkthrough of how to configure and utilize a Dyno Obd2 system for optimal performance tuning. We’ll cover interface selection, channel configuration, troubleshooting, and connection procedures for various interface types.
Understanding Dyno OBD2 System Configuration
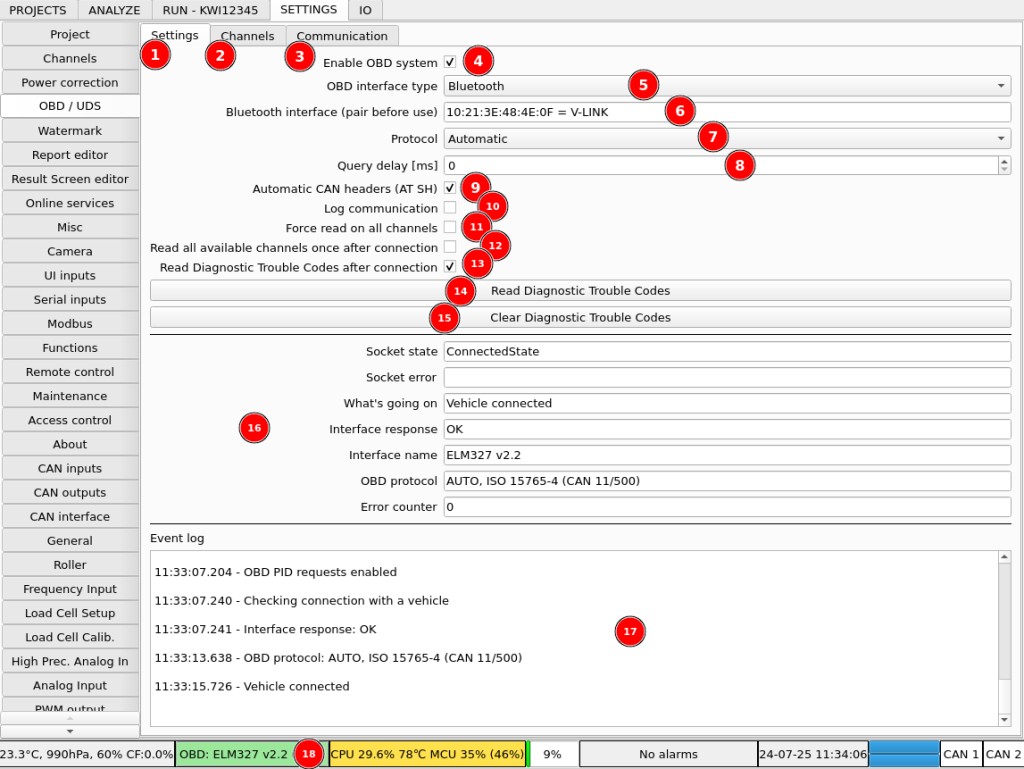
The software used for dyno tuning allows for reading diagnostic data via the vehicle’s OBD/UDS interface. This connection can be established using either a wired USB connection or a wireless Bluetooth connection. Configuration of the OBD/UDS system is typically done within the software’s settings menu, specifically under SETTINGS / OBD / UDS.
The OBD configuration section generally includes several key components:
- Interface Settings Tab: This tab allows you to choose the type of interface you are using (Bluetooth, USB/Serial, or USB/FT2xx) and select the specific device.
- Channels Configuration Tab: This section allows customization of the data channels being read from the vehicle’s ECU.
- Communication Log: This provides a record of the communication between the software and the vehicle’s OBD system, invaluable for troubleshooting connection or data issues.
- System Activation/Deactivation: A simple toggle to enable or disable the entire OBD system, useful for resetting or when the system is not in use.
Dyno OBD2 Interface Selection and Configuration
Choosing the correct interface and configuring it properly is paramount for successful dyno OBD2 data acquisition.
- Interface Type: Select the appropriate interface type – Bluetooth for wireless connection, USB/Serial for basic serial communication interfaces, or USB/FT2xx for interfaces utilizing an FTDI chip.
- Device Selection: After choosing the interface type, select the specific device from the available options. This usually involves a right-click action to populate the list of connected devices.
- OBD Protocol: While often automatically detected, you might need to manually select the correct OBD protocol for faster connection or if auto-detection fails.
- Communication Enhancements: Features like adding a delay between queries or enabling automatic ECU header detection can resolve data mix-up issues, especially with fast OBD interfaces.
- Data Logging: Enable communication logging for troubleshooting connection problems. However, disable it during normal operation to conserve resources.
- Reading Modes: Options for forcing single reads, reading all available channels, or prioritizing specific channels allow flexibility in data acquisition.
- Diagnostic Trouble Codes (DTCs): Enable DTC reading and clearing functionality to address potential engine power reduction or channel availability issues.
Dyno OBD2 Channel Configuration
The Channels tab allows for detailed customization of the data channels.
You can add, remove, and modify channels. Key parameters include:
- Channel Name: Descriptive name for the channel.
- Main Command: The command sent to the vehicle to request specific data.
- Header/Pre/Post Commands: Allows for customization of communication commands.
- Equation/Unit/Priority: Define how the received data is processed, its unit of measurement, and its reading priority.
Importing Standard Channels and Prioritization
Importing a standard channel list is recommended. This is often accomplished by right-clicking in the channel list and selecting “Import from website,” then choosing “OBD2 service 01 standard PIDs.”
Prioritize channels based on the frequency of data change. Assign higher priorities (e.g., 1/1) to rapidly changing parameters like “Timing advance” and lower priorities (e.g., 1/100) to slower-changing values like “Engine coolant temperature.”
Dyno OBD2 Communication Monitoring and Troubleshooting
The Communication tab displays the raw communication data when logging is enabled.
This allows for in-depth analysis of the communication stream for troubleshooting.
Connecting Dyno OBD2 Interfaces: USB, Serial, and Bluetooth
Specific connection procedures vary depending on the chosen interface. Ensure correct baud rate settings for USB/Serial and USB/FT2xx connections. For Bluetooth, pairing the interface with the system’s Bluetooth manager is necessary before connecting within the dyno software.
Conclusion
Properly configuring and utilizing a dyno OBD2 system is crucial for accurate data acquisition during dyno tuning. This guide has provided a comprehensive overview of the key aspects of dyno OBD2, empowering you to optimize your tuning process and achieve desired performance results.