The Clone Stamp Tool is a powerful feature in Photoshop that allows you to duplicate parts of an image. It’s incredibly useful for tasks like removing blemishes, retouching photos, and even creating complex image manipulations. This guide will explain how to use the Clone Stamp Tool effectively.
Defining the Clone Source
The first step in using the Clone Stamp Tool is to define the source area you want to copy. This is the area that will be sampled and replicated when you paint with the tool.
-
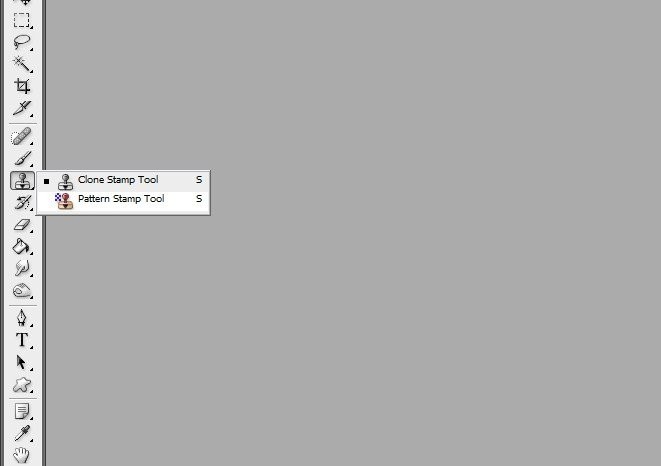
Select the Clone Stamp Tool: Locate the Clone Stamp Tool icon in the Photoshop toolbar. It resembles a stamp. If you can’t find it immediately, it might be hidden behind the Healing Brush Tool. Click and hold the Healing Brush Tool icon to reveal the Clone Stamp Tool.
-
Choose your brush settings: In the options bar at the top of the screen, adjust the brush size, hardness, and opacity. A softer brush will create a more seamless blend, while a harder brush will produce sharper edges. Opacity controls the transparency of the cloned area. Experiment with different settings to find what works best for your image.
-
Set the Sample Point: Hold down the
Altkey (Windows) orOptionkey (Mac) and click on the area of the image you want to clone. This sets your sampling point.
Cloning the Image
Once you’ve defined your source and brush settings, you can start cloning.
-
Begin Painting: Release the
AltorOptionkey and click and drag your mouse over the area you want to retouch or duplicate. As you paint, Photoshop will sample the pixels from your defined source point and apply them to the area you’re painting over. -
Observe the Crosshair: Notice the crosshair cursor that appears as you paint. This indicates the source point that’s currently being sampled. It’s important to keep an eye on this crosshair to ensure you’re cloning the correct area. If the cloned area doesn’t look quite right, you may need to redefine your sample point.
-
Redefine Sample Point as Needed: As you work, you may need to redefine your sample point to avoid repeating patterns or creating unnatural-looking results. Simply hold down
AltorOptionagain and click on a new source area.
Tips for Effective Cloning
- Use Aligned Cloning: By default, the Clone Stamp Tool is set to “Aligned” cloning. This means that the sampling point will move relative to your brush movements. If you uncheck “Aligned” in the options bar, the sampling point will remain fixed, even if you move your brush to a different area.
- Experiment with Blending Modes: In the options bar, you can experiment with different blending modes to achieve various effects. For example, the “Lighten” mode can be useful for removing dark spots, while the “Darken” mode can help remove light spots.
- Practice Makes Perfect: The Clone Stamp Tool takes practice to master. Don’t be discouraged if your first attempts don’t look perfect. Keep experimenting with different settings and techniques to improve your skills.
By following these steps and practicing, you can master the Clone Stamp Tool and use it to enhance your photos and create stunning image manipulations.