
In the competitive world of slot car racing, achieving maximum horsepower from your motor is paramount. For classes that permit motor modifications, meticulous assembly, often referred to as blueprinting, becomes the key to victory. Blueprinting is all about assembling a motor with extreme precision – ensuring bearings are coaxial, magnets are parallel and perfectly spaced, and clearances are finely tuned. This pursuit of precision directly translates to enhanced performance and race wins.
This guide focuses on the C-can slot car motor, a popular choice for both 1/32 and 1/24 scale racers globally. While there are various approaches to assembling a C-can motor, the techniques outlined here represent a proven method for achieving the precision demanded by competitive racers. Many of these techniques are also applicable to D-cans and other motor sizes. It’s crucial to remember that some procedures might not be legal in all racing series, so always consult the rulebook before making modifications.
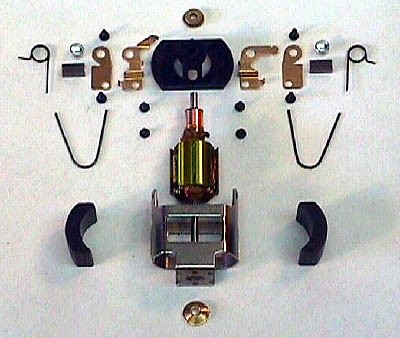
Parts List for Building a Race-Winning C-Can Motor:
- Pro Slot thin motor can
- Pro Slot endbell & hardware
- Mura C-can magnets
- Pro Slot S16C armature
- Pro Slot Golddust brushes
- Champion Light springs
- Slick 7 can bushing (Note: JB Weld is now recommended for securing magnets instead of Slick 7 can bushings)
- FastOnes motor screws
To embark on this blueprinting journey, you’ll need to gather specific parts and, more importantly, specialized tools. The parts list above details the components we’ll use. You can start with a complete motor or select individual parts from different manufacturers as we have. We assume you have matched magnets and a balanced armature suitable for your racing class. Crucially, you need specialized tools to achieve the desired precision. Armature slugs, dial calipers, and a brush hood alignment tool are essential. Other tools like an endbell alignment jig, spring tension tool, and diamond brush radius hone are optional but highly beneficial. And central to our focus today, a slot car motor alignment tool is indispensable for ensuring precise motor assembly.
Essential Tools for Slot Car Motor Blueprinting:
- Camen .530 & .525-inch armature slugs
- DRS C-can alignment mandrel
- Slick 7 brush hood alignment bars
- Magnehone brush hood tool
- Magnehone brush radius tool
- Magnehone armature tool
- PureFast endbell alignment jig
- Sonic Fiddlestick spring tension tool
- Dial calipers
- 3M Double-Stick cellophane tape
- Super glue
- Lighter fluid
- 400-grit Wet-or-Dry sandpaper
- Slot Car Motor Alignment Tool (Specifically for bushing and endbell alignment)
The sequence of blueprinting steps is vital. Follow the order outlined below for optimal results. Double-check all measurements before gluing or soldering – precision is key. Remember the adage: “Measure twice, cut once,” and in this case, “measure twice, assemble once.” Correcting mistakes later is far more difficult than doing it right from the start.
First, if a can bushing is installed, remove it. Then, address spot welds inside the can’s curved surfaces. These welds often create bumps that prevent full magnet contact. Use a Dremel MotoTool or similar grinder with a suitable stone to carefully grind these down.
Next, true the motor can. Mass-produced cans are often not perfectly square or can be bent. The best way to straighten and true the can is using a C-can mandrel. If the can doesn’t easily slide onto the mandrel, gently tap the curved surfaces and edges with a brass hammer until it fits smoothly in both orientations. Ensure the can slides on and off the mandrel easily in both possible orientations before moving on.
After truing, solder the can seams on both curved surfaces for increased strength and stability. Sand away the plating near the seams and score them with a hobby knife for better solder adhesion. Solder the seams, file off any excess solder, and re-verify that the can still slides smoothly on the mandrel.
Now, we focus on establishing the bushing axis, and this is where the slot car motor alignment tool becomes critical. Slide the magnets into the can and secure them with spring clips. Insert an armature slug that fits snugly between the magnets (a .530-inch slug for this motor). Place a can bushing on the slug’s short shaft and insert it into the magnet opening. If the bushing doesn’t fit into the can’s hole, ream it to a larger diameter. The can bushing should fit loosely before soldering. Test-fit the endbell to ensure its bushing isn’t off-center and that the endbell fits correctly into the can. We are using the magnets to define the armature axis, and all subsequent installations will align with this axis, using our slot car motor alignment tool to guarantee precision.
The slot car motor alignment tool is designed to ensure coaxial alignment of the bushing and armature within the motor can. It typically works by providing a precise guide for inserting the bushing and ensuring it is perfectly centered relative to the motor can and magnet assembly. Different tools may have slightly varying designs, but the core principle remains the same – to eliminate any misalignment that can cause friction, vibration, and reduced performance.
Next, install the endbell onto the can and drill screw holes if they aren’t pre-drilled. (Mark the endbell and can for consistent orientation using an engraver.) The endbell needs to fit fully and squarely when screwed in. One method is to position the endbell, lightly super glue it in place, and then drill the four screw holes (always use four). The Pro Slot can differs slightly as it doesn’t restrict endbell rotation. Temporarily mount the brush hoods and brush hood tool onto the endbell and use an endbell alignment jig to square everything before gluing the endbell. Drill the first hole carefully, ensuring the drill is 90 degrees to the can in all directions. A slow-speed cordless Dremel MotoTool is ideal. Install a screw in each hole before drilling the next. Drilling these holes is crucial – mistakes require a new endbell. After drilling, before the glue hardens, detach the endbell and clean off glue residue with a hobby knife. Reinstall the endbell with screws to confirm a square and snug fit.
Now, solder the can bushing in place after removing plating around the hole. Ensure the bushing is fully seated and solder completely around its circumference. Do this with the endbell, slug, and magnets in place, secured with all four screws. Stand the motor can in a wooden block with a hole for the slug’s shaft. Rotate the motor under the soldering iron to achieve a 360-degree solder fillet, using only enough solder for a good bond. If the endbell bushing isn’t secured, remove the endbell and carefully super glue the bushing using a tiny drop or two. Use an old armature to seat it in the endbell’s bushing recess, again with the endbell and screws installed.
Once cooled, remove the endbell and slug, insert the armature, and reinstall the endbell to check bearing alignment. The armature should spin very freely. If not, correct the issue by resoldering or regluing as needed to achieve free armature rotation. Using a slot car motor alignment tool throughout these steps minimizes the chances of misalignment and ensures smooth operation.
Finally, determine the magnet position to correctly locate the armature. The commutator must align for full brush contact, and the armature should float freely between bushings, not touching them. Use dial calipers to push magnets towards the endbell until the armature floats correctly in the magnetic field. Record the distance between the can end and magnet end using the calipers. This measurement is crucial for magnet gluing in the next steps (continued in part 2).
By diligently using a slot car motor alignment tool and following these blueprinting steps, you are well on your way to building a C-can motor that delivers peak performance and race-winning potential. Precision in every step, guided by the right tools, is the hallmark of a championship-caliber slot car motor.