Switching SIM cards on your iPhone might seem daunting, but it’s actually a straightforward process you can accomplish right at home. Whether you’re traveling internationally, changing carriers, or simply need to access the SIM card for another reason, knowing how to safely remove it is essential. This guide will walk you through how to remove your iPhone SIM card using a common household item and provides essential information for various iPhone models.
What You’ll Need: Your Home Tool
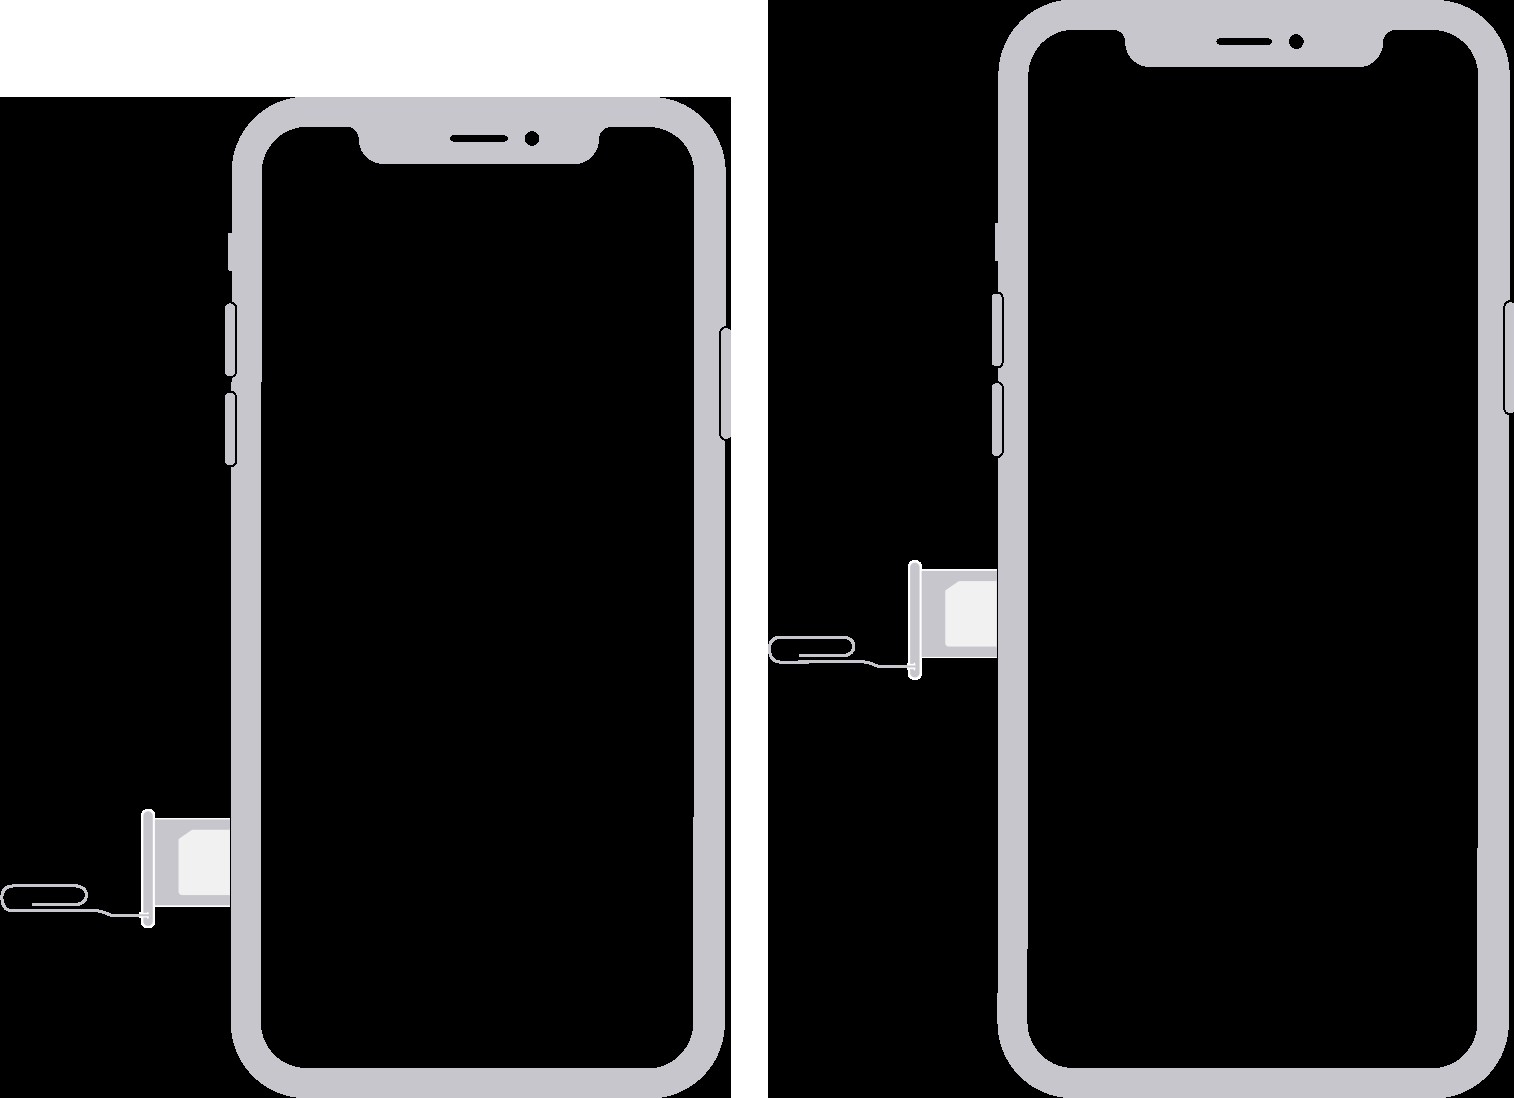
Forget specialized gadgets! The good news is you likely already have the perfect tool to eject your iPhone’s SIM tray: a standard paper clip. While Apple provides a SIM eject tool with new iPhones, a paper clip works just as effectively in most situations. Straighten the paper clip so that one end is extended – this will be your SIM eject tool.
Step-by-Step Guide to Remove Your iPhone SIM Card
The process is similar across most iPhone models, though the SIM tray location varies slightly depending on your device. Here’s a general step-by-step guide:
- Power off your iPhone: Always turn off your iPhone completely before removing or inserting a SIM card. This prevents any potential data corruption or issues.
- Locate the SIM tray: The SIM tray is a small, narrow slot on the exterior of your iPhone. Its location differs depending on your model (more on this below).
- Insert your paper clip: Gently insert the straightened end of your paper clip into the tiny hole located on the SIM tray. You should feel a slight resistance.
- Apply gentle pressure: Push the paper clip straight in, towards your iPhone, with a gentle but firm pressure. Avoid forcing it. You should feel a click or see the SIM tray slightly eject.
- Pull out the SIM tray: Once the tray is ejected, carefully pull it out completely with your fingertips.
- Remove the SIM card: The SIM card sits in the tray. You can now gently lift it out. Note the orientation of the SIM card in the tray before removing it, especially the notch in one corner. This will help you when inserting a new SIM.
Finding Your iPhone SIM Tray Location
The SIM tray location depends on your iPhone model. Here’s a breakdown to help you quickly find it:
SIM Tray on the Left Side
For many recent iPhone models, the SIM tray is located on the left side of the device. This includes:
- iPhone 15, iPhone 15 Plus, iPhone 15 Pro, iPhone 15 Pro Max
- iPhone 14, iPhone 14 Plus, iPhone 14 Pro, iPhone 14 Pro Max
- iPhone 13, iPhone 13 mini, iPhone 13 Pro, iPhone 13 Pro Max
- iPhone 12, iPhone 12 mini, iPhone 12 Pro, iPhone 12 Pro Max
SIM Tray on the Right Side
On some older and specific iPhone models, you’ll find the SIM tray on the right side. This includes:
- iPhone 11, iPhone 11 Pro, iPhone 11 Pro Max
- iPhone XS, iPhone XS Max, iPhone XR, iPhone X
- iPhone SE (1st, 2nd, and 3rd generation)
- iPhone 8, iPhone 8 Plus
- iPhone 7, iPhone 7 Plus
- iPhone 6s, iPhone 6s Plus, iPhone 6, iPhone 6 Plus
- iPhone 5s, iPhone 5c, iPhone 5
- iPhone 4s, iPhone 4 (GSM model)
SIM Tray on the Top
For even older iPhone models, the SIM tray is located on the top edge of the device:
- iPhone 3GS
- iPhone 3G
- Original iPhone
Inserting a New SIM Card
Once you have removed your old SIM, inserting a new one is just as easy:
- Orient the new SIM: Notice the notch in one corner of your new SIM card.
- Place in the tray: Align the notch of the new SIM card with the notch in the SIM tray. It will only fit correctly in one orientation.
- Insert the tray: Hold the tray in the same orientation you removed it and gently slide it back into the iPhone until it’s fully inserted and flush with the phone’s side. It should click into place.
- Power on your iPhone: Turn your iPhone back on. It should automatically detect the new SIM card.
Important Notes and Troubleshooting
- Use the correct SIM tray: Always use the SIM tray designed for your specific iPhone model. Trays from different models are not interchangeable.
- Don’t force it: If you are having difficulty ejecting the SIM tray, do not force it. Double-check that you are inserting the paper clip into the correct hole and applying pressure straight in.
- Seek professional help: If the SIM tray remains stuck, or you are uncomfortable performing this process, visit your carrier store or an Apple Store for assistance. They have specialized tools and expertise to help.
- eSIM for US iPhone 14 and later: If you purchased an iPhone 14 or later in the United States, your device uses eSIM technology and does not have a physical SIM tray. Contact your carrier to set up eSIM service.
- eSIM limitations in China mainland: iPhone models in China mainland do not support eSIM.
Conclusion
Removing and inserting your iPhone SIM card at home is a simple task when you know how. Using a paper clip as a convenient home tool makes the process accessible to everyone. By following these steps and identifying your SIM tray location, you can confidently manage your iPhone SIM card whenever needed. Remember to be gentle, avoid force, and seek professional help if you encounter any issues.