
Is your car’s interior resembling a disaster zone? Don’t be ashamed, you’re not alone! Many car owners face the challenge of keeping their vehicles clean, especially with busy lives or family in tow. But a messy car can be more than just embarrassing; it can be stressful and even unhygienic. This guide, crafted by an auto repair expert, will walk you through the best car cleaning tips and highlight the Dirty Car Tools you need to transform your vehicle from chaos to pristine.
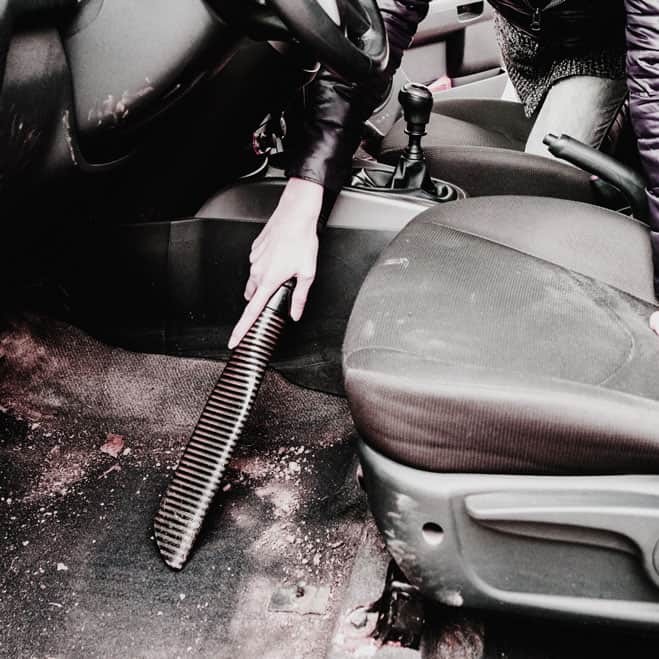 Vacuuming car interior to clean up mess
For years, I’ve witnessed the aftermath of neglected car interiors in my auto repair shop. From mysterious stains to embedded crumbs, I’ve seen it all. While I specialize in vehicle mechanics, I understand that car care extends to cleanliness. A clean car is a happy car, and a happy owner! Let’s dive into how to effectively clean your car interior, focusing on the right dirty car tools and techniques to get the job done efficiently.
Deep Cleaning Your Dirty Car: A Step-by-Step Guide
Cleaning a truly messy car requires a systematic approach. We’ll break it down into manageable steps, emphasizing the dirty car tools that will make each task easier and more effective.
Step 1: Declutter and Remove Loose Debris – The Pre-Cleaning Prep
Before you even think about cleaning, the first step is to declutter. Think of this as the “excavation” phase of your car cleaning project.
Dirty Car Tools for Decluttering:
- Garbage Bags: Essential for collecting trash – food wrappers, empty containers, and general waste.
- Storage Bins/Boxes: Use these to categorize items you remove. Have separate bins for:
- Items to Keep in Car: Organize essential documents, reusable shopping bags, or emergency kits that will go back into the car.
- Items to Discard (Carefully): Double-check for valuables before tossing!
- Items to Relocate: Belongings that should be taken into the house or elsewhere.
Pro Tip: Don’t underestimate the power of decluttering. Removing loose items makes vacuuming and deeper cleaning much easier and more effective.
Step 2: Tackling Car Seats – From Grime to Gleaming
Car seats bear the brunt of daily use. They collect crumbs, stains, pet hair, and all sorts of unmentionables. Effective seat cleaning is crucial for a fresh car interior.
Dirty Car Tools for Car Seat Cleaning:
- Stiff Bristle Brush or Old Toothbrush: Essential dirty car tools for loosening debris from crevices, seams, and around seatbelts.
- Plastic Scraper or Dull Knife: Carefully remove stuck-on substances like dried food or melted crayon.
- Vacuum Cleaner with Attachments: A powerful vacuum is a must-have dirty car tool. Use the crevice tool for tight spots and the upholstery attachment for larger surfaces. Consider a wet/dry vac for tougher stains if you have fabric seats.
- Rubber Gloves or Pet Hair Removal Tool: For pet hair and stubborn lint, these dirty car tools are game-changers. Slightly dampen the seats and use the rubber tool to gather hair into clumps for easy vacuuming. A squeegee can also work.
- Upholstery Cleaner: Choose a quality cleaner appropriate for your seat material (fabric or leather). For fabric, consider a dedicated auto upholstery cleaner or a solution of mild detergent and water. For leather, use a leather cleaner and conditioner.
Cleaning Cloth Car Seats:
- Pre-treat Stains: Use a stain remover like Shout Auto Cleaner or a DIY solution of hydrogen peroxide and blue Dawn dish soap (use sparingly due to suds). Test any cleaner in an inconspicuous area first.
- Apply Cleaner: Lightly dampen the entire seat cushion to prevent water rings. Apply your chosen cleaner according to product instructions.
- Scrub Gently: Use a soft brush or microfiber cloth to work the cleaner into the fabric.
- Vacuum Thoroughly: Use a wet/dry vac to extract as much moisture and cleaner as possible. Allow seats to air dry completely.
Cleaning Leather Car Seats:
- Dust and Vacuum: Remove loose dirt and debris.
- Apply Leather Cleaner: Use a leather-specific cleaner and a microfiber cloth to gently clean the seats in sections.
- Condition Leather: After cleaning, apply a leather conditioner to keep the leather supple and prevent cracking.
Step 3: Revitalizing Floor Mats – From Muddy to Magnificent
Floor mats endure constant dirt and grime from shoes. Cleaning them properly makes a significant difference in the overall cleanliness of your car.
Dirty Car Tools for Floor Mat Cleaning:
- Rubber Floor Mat Cleaner (for rubber mats): Soap and water, all-purpose cleaner, or specialized rubber mat cleaners work well. Magic erasers can help remove scuff marks.
- Carpet Cleaner (for carpet mats): Upholstery cleaner, carpet stain remover, or a carpet cleaning machine can be used.
- Stiff Brush: For scrubbing both rubber and carpet mats.
- Vacuum Cleaner: For removing loose dirt and debris before and after cleaning.
- Pet Hair Removal Tool (optional): For embedded pet hair in carpet mats.
Cleaning Rubber Floor Mats:
- Remove and Rinse: Take mats out of the car and rinse off loose dirt with a hose.
- Scrub with Cleaner: Use soapy water or rubber mat cleaner and a stiff brush to scrub thoroughly.
- Rinse and Dry: Rinse mats thoroughly with water and allow them to air dry completely before placing them back in the car.
Cleaning Carpet Floor Mats:
- Vacuum Thoroughly: Remove as much loose dirt and debris as possible.
- Pre-treat Stains: Apply stain remover to any visible stains.
- Clean with Carpet Cleaner: Use upholstery cleaner or a carpet cleaning machine according to product instructions.
- Vacuum Again: Vacuum to remove excess moisture and cleaner.
- Air Dry: Allow mats to air dry completely before returning them to the car.
Step 4: Detailing the Dashboard and Vinyl – Bringing Back the Shine
The dashboard and vinyl surfaces often accumulate dust, grime, and fingerprints. Cleaning these areas enhances the interior’s appearance and reduces allergens.
Dirty Car Tools for Dashboard and Vinyl Cleaning:
- Soft Brushes (various sizes): Essential dirty car tools for dusting vents, crevices, and intricate areas. Makeup brushes, paint brushes, or specialized car detailing brushes work well.
- Microfiber Cloths: For dusting, cleaning, and applying protectants.
- Toothpicks and Cotton Swabs (Q-tips): For reaching very tight crevices.
- Compressed Air (optional): For blowing dust out of vents and hard-to-reach areas.
- Vinyl Cleaner and Protectant: Choose a quality vinyl cleaner like Mothers VLR to clean and protect vinyl surfaces.
- Magic Eraser (use with caution): For heavily soiled areas, but test in an inconspicuous spot first as it can be abrasive.
Cleaning Dashboard and Vinyl:
- Dust Thoroughly: Use soft brushes and microfiber cloths to remove dust from all dashboard surfaces, vents, and crevices.
- Clean with Vinyl Cleaner: Apply vinyl cleaner to a microfiber cloth and wipe down all vinyl surfaces, including the dashboard, door panels, and console.
- Clean Cupholders: Soak cupholders in soapy water to loosen grime. Use a sock-covered cup to twist and clean inside cupholders.
- Wipe Down Controls: Clean controls and buttons with a slightly damp microfiber cloth, being careful not to get moisture inside electronic components.
- Apply Vinyl Protectant (optional): Use a vinyl protectant to add shine and protect against UV damage.
Step 5: Window and Mirror Cleaning – Crystal Clear Visibility
Clean windows and mirrors are essential for safe driving and a polished look.
Dirty Car Tools for Window and Mirror Cleaning:
- Glass Cleaner: Invisible Glass is a highly recommended streak-free glass cleaner.
- Microfiber Cloths or Newspaper/Coffee Filters: For streak-free wiping. Newspaper or coffee filters are surprisingly effective for buffing glass.
- Window Cleaning Tool with Extension (optional): For reaching the inside of the windshield, especially in deep-set dashboards.
Cleaning Windows and Mirrors:
- Clean Interior Windows First: Work in the shade to see streaks more easily. Spray glass cleaner onto a microfiber cloth (not directly on the window to avoid overspray). Wipe windows thoroughly and buff dry with a clean, dry microfiber cloth, newspaper, or coffee filter.
- Clean Exterior Windows: Repeat the process for exterior windows.
- Clean Window Edges: Roll windows down slightly and clean the top edges and window wells to prevent dirt from transferring to clean glass.
- Clean Mirrors and Screens: Use a microfiber cloth and glass cleaner for mirrors. For electronic screens, dust with a Swiffer and gently wipe with a slightly damp microfiber cloth – avoid glass cleaner on screens.
Maintaining a Clean Car: Preventing Future Messes
Once you’ve invested the time in deep cleaning, maintaining a clean car becomes much easier. Here are some tips:
- Regular Quick Cleanups: Dedicate 10-15 minutes each week to vacuuming and wiping down surfaces.
- Trash Disposal: Keep a small trash bag or container in your car and empty it regularly.
- Prevent Spills: Use spill-proof cups and containers. Clean up spills immediately.
- Car Mats: Use car mats to protect your car’s carpet and make cleaning easier.
- Organize: Use car organizers to keep belongings tidy and prevent clutter from accumulating.
Conclusion: Enjoy the Pride of a Clean Car
Cleaning a dirty car can feel like a daunting task, but with the right dirty car tools and a step-by-step approach, it’s absolutely achievable. A clean car not only looks and smells better, but it also creates a more pleasant and stress-free driving environment. Invest in the essential dirty car tools mentioned in this guide, follow these expert tips, and you’ll be well on your way to enjoying a consistently clean and comfortable vehicle. Say goodbye to car shame and hello to car pride!